Google and Bing are having war in search engines , Google will now tackle apple and windows in OS [ Operating System ] and since Google launched jackass facebook kinda spoof lite version integrated inside Gmail - Google Buzz , again Google is planning new facebook killer - GoogleMe !
GoogleMe is not official announcement from google team but this rumour is rocking the internet on fire . Right now addicted netizens as well as beginners know only of the hardcore two giants - Facebook and Google and now when google launched buzz , it failed miserably but still its still one of the bookmarking kinda service and many widgets are usually seen in 3 - 4 blogs :) Orkut was the one of first free social service that was widely used but since after people tested facebook many of them ditched orkut ! And now there’s a big news that Google will attempt to pull the ground from under Facebook’s feet, by launching a new social networking service of its own possibly mixing and creating a hybrid of orkut , google profiles and of course google buzz added with much more features to crush facebook if rumour is true .
This rumour was tweeted by Digg founder, Kevin Rose, who who’d heard the name of the upcoming “Facebook-killer” would be “Google Me”.
Facebook sticks to social networking and google is waving hands towards Gmail, Docs, Maps, Calendar , OS , and many other stuff . This move of google shows that google is more higher than facebook and have huge potential if it integrates all of its services under a common social netwok which facebook does not provide . Can it be a Facebook killer? First of all , is this rumor real ? Time will tell ...
Google is a search engine which searches all the blogs and websites present all over the internet . However wikipedia is another search engine which is slightly more accurate then google as it searches only the content which grout of writers submit . Generally search results are more found on Google and less on WIki , however in terms of accuracy and quality wikipedia beats google ! And if you want to search both these engines at a same time then there is a fix - Googlepedia Googlepedia is one such tool that can make searching better and accurate as you can get search results from both the sites at once and that too on a single page ! It is not a website but a tool for firefox and extension recently available for google chrome . Click on image for large screenshot
Links images directly to their full-sized versions
Removes Google AdWords [ featured ads ]
Can be expanded to take the full width of the page
Uses your local language ,Wikipedia based on the Google language
Hide button to disable Googlepedia [ In-case you do not need to use right now ]
This tool is very necessary for those people who constantly search for some popular celebrities or companies , in this way they can come to know the history of those search results via wiki and the latest updtes and discussions via google ! Similarly if you need to check Google , Bing and Yahoo all trio at the same time , check out this link .
Star Wars is an American epic space opera franchise first film which lead to worldwide pop culture phenomenon .This film is made into books, television series, video games, as well as many comic books and the film has got Academy award . I hope many people might have seen this movie , but if you have windows OS , you can watch again the whole movie !
This is another trick in Microsoft Windows : Follow the following easy steps to watch Star Wars – in MS DOS version :
Go to Start , then click on Run. In the Run box, type cmd and press OK
This will open the open the MS command prompt window
Within command prompt, type telnet towel.blinkenlights.nl [ you cannot copy paste , you Need to type :P ] and hit ENTER.
Get ready to watch the lengthy replica of star wars in Black and White version !
Windows Media Player is available for the Windows, Windows Mobile, and Mac operating systems and will be soon for Linux . Windows media player is the latest version which is available freely if you have got WIndows 7. However there are little bit misconceptions about it for VISTA and XP . If you have got pirated software then naturally this latest music player is not available . So there's a risk of your PC getting banged if you download WMP 12 online and that too from microsoft site and get caught using pirated OS .THere are many tricks and many cracked versions available so that you can safeguard your pc .
However WMP 12 is only and only available for Windows 7 users ! And even if you have original Vista/ XP OS then you cant do anything to make WMP 12 working . This is a big confusion among windows users and many people just go on searching this software on torrent and pirated / cracked sites and themselves get hacked . Many of such sites claim to have cracked this cool music player even compatible for Window's 98 ! However this is not true an downloading these claimed fishy software could make your PC to a long sleep .
However you can certainly download many such skins freely even on WMP 12 for XP and Vista . But its somewhat good news for Vista users as they can hack their Windows media player and make it look and run almost like wmp12 . Here's how :
Before doing installation,Create a restore in your computer
. This way nothing can go wrong with your current version of Windows Media Player.
Backup wmploc.dll from C:\Windows\System32
Backup Windows Media Player folder from C:\Program Files
Copy wmploc.dll from downloaded files in C:\Windows\System32
Copy Windows Media Player folder from downloaded files to C:\Program Files
Note : This Windows media player 12 has been taken from the original files of Windows Media Player 12.0.7000.7000 from Windows 7 Build 7000.
We're showing some of the most popular themes of Mozilla Firefox. We, the users can not get satisfaction with the boring old stuff that everyone else is using, if it is a theme or wallpaper. Designers have a basic quality of being different from many not-so creative. This post is dedicated to lovers of Firefox. We have collected some great themes of Firefox to give a new look and, unlike your browser.
Here is the gallery of Mozilla Firefox 2011 themes collection for windows 7. You can apply these themes to your browser for free. So check out these Cool Firefox themes with a variety of style bars, etc. and free icons that look oh-so-easy on your browser. Go ahead and make sure your browser unique looks, among others. To download it just click on the bottom of the image template that will be taken.
Developers usually release new versions of software after improving its features, GUI, removing some bugs or when security weaknesses in earlier versions were fixed. If you would like to keep the software on your computer up-to-date, you may find it difficult and time-consuming if you have many programs installed. Sometimes software will automatically check for updates (such as Adobe Reader, Mozilla's Firefox and Thunderbird, Skype, iTunes, etc.), or it will update itself (e.g. Google Chrome) but this isn't true of all software. That's where Software Update Monitors (SUMs) are useful. A (sometimes) quick scan of your computer by one of these products will reveal which software is old and needs to be updated. So, if you would like to know which tools I recommend to keep your software updated (and which I use to keep my software updated), read on. Just a word of warning though, updated software may behave in a manner that is different to the version you have installed. Very rarely updates may have a bug that makes it unsafe to upgrade. If you have any doubts, please do an internet search for any problems related to the upgrade.
Discussion
There are different types of users that may wish to use update monitors, so I have separated them into four categories. The first is for the security concious. I recommend that everyone install this excellent application. The second category is for people that want an easy way of keeping their software updated, the third is for intermediate/advanced users that don't mind taking some time to set up their software, while the final category is for Mac users.
Security
Secunia's Personal Software Inspector(PSI) is an incredible software updater that all Windows users should have installed. It may not keep your software updated when there are no known security issued related to the software, but it will ensure that your software is at the most secure it can be. It will let you know which programs are patched, which are insecure and which are no longer maintained. It even gives the installed software a rating related to its impact on the security of your computer. After it has scanned your PC, it can remain open in the background to keep an eye on any changes you make. It lists all your programs, and provides links to the vendor's homepage, technical details, the installation folder and "Add/Remove Programs". If it detects software that requires patching, it will provide a link to the download page, or update the software itself. Unfortunately, it's not perfect and does not support as much software as SUMo, but it works well and I would suggest using it occasionally to ensure your computer has no security flaws due to out-of-date software.
Easy-To-Use
FileHippo's Update Checker(UDC) is fast and very easy to use, but detects only a limited number of programs (probably adequate for most users). It scans quickly and takes you to a webpage that provides a list of the programs it detected and links to the FileHippo download page for the new software. It also allows you to decide whether or not to view Beta software. In order to detect portable software, you have to add the folder in which the program resides to the custom search space. This makes it slower, and it still doesn't detect all software. Instead it detects only the software that's available on the FileHippo website. However, UDC does allow multiple folders of portable software to be added to the custom search space, thereby potentially reducing the search space and speeding up the search. Beware though, there have been unconfirmed reports of UDC presenting problems to those users that have a non-English version of Windows installed. Further feedback regarding this problem would be appreciated.
Intermediate/Advanced Users
My favourite software update monitor is KC Softwares' Software Update Monitor Lite(SUMo) and it may be the best software update monitor for expert users. It's faster than Secunia's PSI, but slower than UDC and requires more bandwidth to check for updates than UDC. During a normal scan SUMo will search your start menu for a list of programs, while a complete scan checks your "Program Files" folder, yielding more results that may require some selective elimination. SUMo also let's you decide whether or not you want to be notified about Beta software. Another feature that you may or may not like about SUMo is the result you obtain by clicking on the "Update" link for new software. Whereas PSI and Update Checker take you directly to a download page, SUMo takes you to a webpage with usage statistics about recent versions of the program, and displays the number of users who use each version. Although that may be interesting, there is no direct link to a download page. SUMo's page gives you links to five major download sites' search pages (which sometimes do not work with the information supplied by SUMo) and a link to a Google search for the software. However, by not being restricted to a database of downloadable software, the SUMo database can support any software its users' SUMo report. The advantage of SUMo is that it informs you of updates to software that is not limited to security updates (such as PSI) or availablity on FileHippo (UDC). It also lets you add or remove programs to the list it scans for updates by simply dragging the executable into SUMo's open window; a feature not available on any other software update monitor (UDC allows one to add folders to the search space). Unfortunately, some developers do not include version information in their binaries which makes it impossible for SUMo to detect updates for them. This is a problem for most software update monitors. Unfortunately, when SUMo performs its first thorough scan it detects executable files that may not be the main executable files of your installed software. Experienced PC users should therefore take care to add the executable files that should not be checked for updates to the ignore list. Once this has been done, the unwanted executables will not appear in future scans. WARNING: Should you decide to download SUMo, please ensure that you download the "Lite" or ZIP/7z versions (find the ZIP/7z versions on the download page - the links with the 7z and ZIP icons - the "Lite" version is below that, where it says "Free of all sponsors download links", as indicated in the screen shot below). The full version comes with a program called Relevant Knowledge, which is detected by most security software as spyware. While I agree with many that have contacted me that the developer is (at best) damaging his reputation by bundling SUMo with RK, you may read his explanation here. The NoRK version comes bundled with a SUMo toolbar. The "Lite" version is identical to the full version, only without the spyware, and therefore deserves to be on this list. The safest to use would be the compressed versions as they do not have installers that can add any unwanted software/keys to your system/registry.
Mac
The application AppFresh by metaquark is a very useful software updater for Macs. It keeps applications, widgets and Apple components updated (you can select which ones you wish to include), making use of i use this to check which updates are available, and to supply direct download links. Unfortunately, this means it sometimes informs me of updates that are not stable releases, even though one may choose to be informed of either stable or nightly builds. It also reports that the update status of some software is unknown, even though it can detect the version correctly and find the correct entry in the online database. Strange. However, it is generally good and easy to use. It is the only software update monitor I am aware of for Macs (I tried the Mac version of Software Informer, but it did not work), so if you are aware of others, please let me know.
Other Software Update Monitors
Ketarin takes another approach at software updating. It keeps your install files up-to-date. Once installed, you have to point it to the download link of the software you wish to keep updated (or give it its FileHippo ID). This is quite nifty if you have to keep a database of install files updated for software you may not have installed on your own machine. Many users have posted other SUMs since this article was first published. I will briefly cover some of them and tell you why I did not like them. Update Notifier used to be my top pick, but it was a victim of its own success when the team was unable to scale their venture accordingly. The project may be started again and I will keep you updated. UpdateStar is a SUM that I find annoying to use. It keeps asking if you wish to upgrade to a premium service and the user interface is quite cluttered. The updates generally appear quite reliable, though it is not perfect. It does not add anything that would make me want to use it over those listed in the review. Software Informer has improved a lot. It is very thorough, with the side-effect that it often informed me of updates that are not available, or it would inform me of an update for version I have installed because it interpreted the version incorrectly. Probably the best of the updaters not discussed in the main discussion. The Mac version is terrible. I can't even get it to work. TechTracker by CNET gives me a few concerns. Their privacy policy states that they collect information about you and share it with other companies. It also comes bundled with OpenCandy. That should be enough to stay far away from it. But, I decided to test it anyway so that you don't need to. Seemed quite good since it has the might of CNET's database behind it. Still, I'm not sure if it is worth it over UDC because of the privacy concerns. I signed up with an email account that I created especially for it and have been getting spam (approximately once a week) from CNET since (GMail detects it as such). DownloadPlex.com's Software Update is slow with updates, does not make it clear which applications have updates and sometimes informs of updates that do not exist, or suggests updates that are not stable releases. Software-UpToDate has recently been updated. I will need to test it before making comments on it. It seems that it does not support all software though. There is a similar group of software that acts like a software manager, similar to the Synaptic Package Manager used by Ubuntu. They give you access to a selected group of programs, install them and keep them up-to-date. There are examples such as Appsnap, Appupdater and FreewareUpdater. I could not get Appupdater to work and Appsnap and FreewareUpdater only supported a limited amount of software (and could not detect software that was already installed). I feel these three programs belong in a different category and will not review them here.
RSS Feeds
There are some website RSS feeds I like to check for updates. FreewareFiles has a great feed that list updates very quickly after they have been released, while Freeware-Guide gathers a list of software updated in a day and displays the list in an RSS feed the following day. FileHippo and Softpedia also have RSS feeds for the latest additions to their databases. Here are the five feeds:
In this post I will show how to create a simple virus that disables/blocks the USB ports on the computer (PC). As usual I use my favorite C programming language to create this virus. Anyone with a basic knowledge of C language should be able to understand the working of this virus program.Once this virus is executed it will immediately disable all the USB ports on the computer. As a result the you'll will not be able to use your pen drive or any other USB peripheral on the computer. The source code for this virus is available for download. You can test this virus on your own computer without any worries since I have also given a program to re-enable all the USB ports.
1. Download the USB_Block.rar file on to your computer. 2. It contains the following 4 files. 3. You need to compile them before you can run it. A step-by-step procedure to compile C programs is given in my post - How to Compile C Programs. 4. Upon compilation of block_usb.c you get block_usb.exe which is a simple virus that will block (disable) all the USB ports on the computer upon execution (double click). 5. To test this virus, just run the block_usb.exe file and insert a USB pen drive (thumb drive). Now you can see that your pen drive will never get detected. To re-enable the USB ports just run the unblock_usb.exe (you need to compile unblock_usb.c) file. Now insert the pen drive and it should get detected. 6. You can also change the icon of this file to make it look like a legitimate program. For more details on this refer my post – How to Change the ICON of an EXE file (This step is also optional).
Max Keylogger allows you to record and monitor every activity happens on your computer and have it delivered to your email! Automatically stealthily record every IM chat, monitor every website visited and control it all so easily.
No other PC monitor software gives you the security of knowing you'll be able to collect every screenshot and every keystroke with just the click of a button.
Every keystroke from popular chat, online email and social sites is recorded. Including Myspace, Facebook, Twitter,ICQ, Yahoo Messenger, MSN Messenger, AIM,Skype and any more other programs. Download The Exe,Keygen,Serial Here [1.92MB] No Adware,Malware And Virus Keygen Verification Screen Shot:
New version of the utility that inserts a valid license to update NOD32 Commercial versions 2.5.x, 2.7.x, 3.x, 4.x, 5.0.x, including Eset Smart Security.
Significant improvements since version 1.4.0 Final:
- ESET Support v5. - Added the option to choose the ESET product type for which the license to download (VAS = NOD32 Antivirus, ESET Smart Security ESS =, EAVBE = NOD32 Antivirus Business Edition Eset Smart Security ESSBE = Business Edition). - Added an option to change the seconds to wait for the detection of internet when activating the option "Start with the system." - Added languages: French, Persian, Russian, Ukrainian, Swedish. - Fixed errors when connecting to certain license servers.
If You Have Forgotton Your Folder Lock Software An Easy Way To Open The Folder Lock And Take Your Files Easy.To Break Follow The Below Steps: *Open Folder Lock Software *It Provides For Password. *Now Type The Folder Lock Software Registration Key On The Password Box Instead Of Your Password. *If You Are Not Having The Key Try This:683071673 ScreenShots: Type In Password Box: 683071673
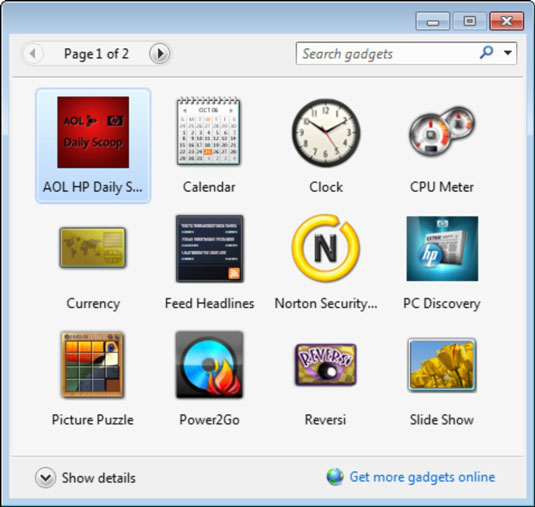
With the Currency gadget on your Windows desktop, you can convert one set of currency (such as dollars) to something else (like euros). The Currency gadget works with your Internet connection to get you the latest conversion rates.
A gadget, by the way, is a small applet that fills a specific function, such as telling you what time it is. You can arrange multiple gadgets on the desktop by repeating these steps.
Click the Currency gadget and drag it to the desktop.
The Currency gadget appears on the desktop where you dropped it. If you're connected to the Internet, the current conversion rates are shown for dollars and euros.
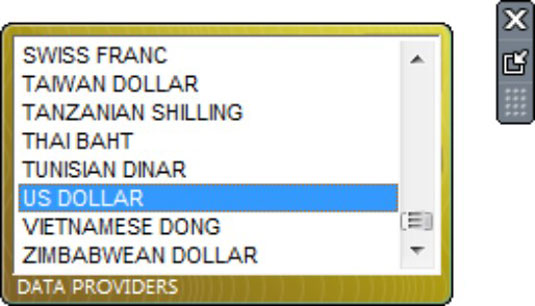
If you add multiple countries to the Currency gadget, you can compare multiple currencies at the same time. Just click the plus symbol (+) next to Data Providers to add another country; remove a country by clicking the X next to it.
To change to a smaller size, hover the mouse over the gadget and when the panel flies out, clickt he Smaller Size button.
To change currencies, click a currency name, and select the currency to use.
When you click a currency name such as USD, a list of available currencies appears. Click another currency in this list to change which currencies to convert from and to.
To view the online source for the latest currency conversion rates, with the larger size Currency gadget displayed, click the Data Providers link. The MSN Money site opens on the Investing page. Click the Markets button at the page that appears, and finally click the Currency Rates link on the left page to view current rates.
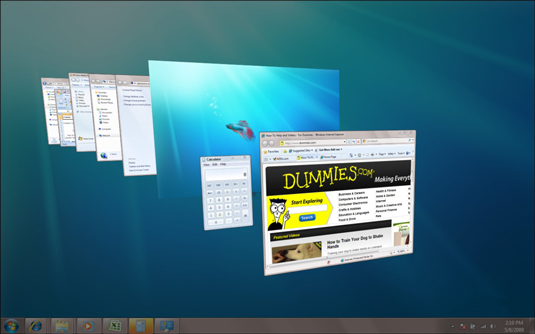
When you have many windows open in Windows 7, you can use the Flip and Flip 3-D features to quickly organize your applications. Flip and Flip 3-D, like AeroPeek, allow you to view what is happening in all of your open windows and shuffle them so that the one you want is on top.
Flip
To use the Flip feature, hold down Alt and press Tab. Windows 7 displays a panel in the middle of the desktop showing thumbnails of each open window. Each time you press Tab, a different one of the windows is selected and its name appears at the top of the panel. When you release the Alt key, the panel hides again and the last window selected becomes the open window on your display. If you want to take your time scrolling through the open windows, hold the Ctrl key down while you press the Alt and Tab key. The thumbnail panel will open and stay that way even after you release all the keys. This allows you to use the right and left arrow keys to find the one you want. When you've highlighted the window you want to work with, press Enter to close the panel and display the selected window on the desktop.
To use the Flip 3D feature, hold down the Windows logo key (the key with picture of a waving flag divided into four parts) and then press the Tab key. All the open windows will cascade across your desktop in 3-D. Flip through the cascading thumbnails by continuing to the press the Tab key. When the thumbnail of the window you want appears at the front of the stack, release the Windows logo key. Your windows will all lay back down with the window you want on top.
If your mouse has a center wheel, you can then flip through the 3-D stack by turning the wheel. (Turn the wheel forward to flip backward through the stack and backward to flip forward.)
As with Flip, holding the Ctrl key down while activating Flip 3D ensures that the windows remain cascaded across your desktop while you peruse them with your right and left arrow keys. When the window you want to access is at the front of the stack, you can press Enter to close the stack and display its window on top of the desktop.
With Windows 7 you now also have the Aero Peek option for looking at open windows. Just hover your mouse above any taskbar button to view thumbnails of all the open windows. Thumbnails not big enough for you? Just slide your mouse up into the thumbnail and the window will appear full screen. When you find what you're looking for, just click the thumbnail, and that window will stay on your desktop for you.
At the top of the Firefox window, click the Firefox button (Tools menu in Windows XP) and select Set Up Sync. The Firefox Sync Setup window will open.
Click Create a New Account.
Fill in your account details:
Email address
Choose a password and enter it a second time to make sure you have it right.
Agree to the Terms of Service and Privacy Policy.
Confirm that you're not a robot!
To change what information gets synced, click Sync Options. The default is to sync your add-ons, bookmarks, passwords, preferences, history and tabs.
Finally, click Next.
You will see a Setup Complete! message. Click Close to close the progress window and take you back to Firefox. Don't worry, your data will continue to be encrypted and uploaded in the background.
Note: This first sync should happen quickly but may take more than 30 minutes depending on how much information needs to be synced.
Part 2: Get the easy setup code from your other computer
Do these steps on the second computer that you are trying to add to Firefox Sync.
At the top of the Firefox window, click the Firefox button (Tools menu in Windows XP) and select Set Up Sync. The Firefox Sync Setup window will open.
Click I Have an Account.
The code to add this computer will be displayed.
Part 3: Connect your other computer to your Sync account
Do these steps on the computer from Part 1.
Click the Home button (or type about:home in the location bar) to bring up the default Firefox home page.
At the bottom of the home page, click the Sync link to open the Sync settings window.
Then click the Pair a device link and the Firefox Sync Setup window will open.
Enter the twelve character code generated on your other device and click Next.
When the code is accepted you will see a Device Connected message and your device will immediately begin syncing. Click Finish to close the setup window.
What if I'm not near my first computer?
Do these steps on the second computer that you are trying to add to Firefox Sync. If you are trying to add another computer to Firefox Sync and you are not near your first computer so that you can enter the code, you can still get it done by entering your account information.
At the top of the Firefox window, click the Firefox button (Tools menu in Windows XP) and select Set Up Sync. The Firefox Sync Setup window will open.
Click I Have an Account.
Since you're not near the device with Sync already set up, click the I don't have the device with me link.
Disabling an add-on will turn it off without removing it:
At the top of the Firefox window, click on the Firefox button (Tools menu in Windows XP), and then click Add-ons. The Add-ons Manager tab will open.
In the Add-ons Manager tab, select the Extensions or Appearance or Plugins panel.
Select the add-on you wish to disable.
Click the Disable button.
Click Restart now if it pops up. Your tabs will be saved and restored after the restart.
To re-enable the add-on, find it in the list of Add-ons and click Enable, then restart Firefox.
How to remove extensions and themes
At the top of the Firefox window, click on the Firefox button (Tools menu in Windows XP), and then click Add-ons. The Add-ons Manager tab will open.
In the Add-ons Manager tab, select the Extensions or Appearance panel.
Select the add-on you wish to remove.
Click the Remove button.
Click Restart now if it pops up. Your tabs will be saved and restored after the restart.
How to uninstall plugins
Most plugins come with their own uninstallation utilities. For help uninstalling a certain plugin, go to the list of plugins articles and select the article for the plugin you want to uninstall.
Share this article: You can use the link http://mzl.la/Ll3xVk to easily share this article with others. It will display instructions automatically customized for their operating system and language.
Greetings to everyone! As the subject of this post indicates I will be discussing the best possible way to exchange e-currencies online. I get a lot of emails asking for exchange and also asking for options available to exchange e-currency online. So I decided to share how I exchange e-currency online. As far as I know the best professional service provider in this field is Xchanger.org! I have seen many e-currency exchanger’s but none is better than Xchanger till now. “Fast, Professional & Trusted” that is what describes Xchanger the best. At current Xchanger provides service for exchanging between “Liberty Reserve, Alertpay, Perfect Money and Solid Trust Pay”. And not to forget that Xchanger is an approved exchanger for all e-currencies it deals in. The exchange rates are as follows -
LIBERTY RESERVE – 0%(to SolidTrustPay) 1%(to Alertpay) 3%(to Perfect Money). SOLIDTRUSTPAY – 7.90%(to Liberty Reserve) 7.90%(to Alertpay) 7.90%(to Perfect Money). ALERTPAY – 9.90%(to Liberty Reserve) 3.90%(to SolidTrustPay) 5.90%(to Perfect Money). PERFECT MONEY – 5.00%(to Liberty Reserve) 0.00%(to SolidTrustPay) 1.00%(to Alertpay).
Time taken for exchanges are as follows -
FROM LR: 3hrs 25mins 34secs FROM PM: 3hrs 25mins 34secs FROM STP: 30hrs 26mins 41secs FROM AP: 48hrs 7mins 47secs
The time taken is longer in case of STP and AP because they need to get the approval for the transaction from the respective e-currencies. So once they get the approval the transaction is completed. And keep in mind that for Alertpay exchanges you will need to have a verified Alertpay account. Xchanger also offers discount codes to the members. If you are using their service for the very first time then you can use this code “XCFSTIME” and get a healthy 20% discount on the fee charged for the exchange. Not only this every time you make a successful exchange you will be given an exchange code. The exchange code will be emailed to you and only you can use this code for your next exchange in order to get a discount. Xchanger also provides SMS notification, you will need to complete the SMS notification field on the exchange form and you will be notified on your cell phone as soon as your order is completed. As far as the security is concerned, Xchanger is hosted on a dedicated server and the website is SSL encrypted with 256-bit encryption provided by GoDaddy. At Xchanger you can even earn money through affiliate program. Xchanger offers 15% of their fees as commission. I think that is the highest among all other exchangers. Xchanger provides support through the ticket system and also through live chat. Live chat support is generally available from “8:00 am to 10:00 pm” (GMT time). In case the live support is offline during this time then you can send a support ticket and you will get a response with in minutes. If you are happy with the service of Xchanger then you can post a testimonial through your account and to the tally of “1665″ testimonials so far. You can check for yourself how happy the customers are using the services of Xchanger, check it here - https://xchanger.org/testimonials.php. For a limited time Xchanger has reduced the rates for exchanges from Alertpay. You can read the official announcement below -
We have drastically reduced the fees for all exchanges FROM AlertPay by 4% for alimitedtime only!!. AlertPay to Liberty Reserve at 5.9% (down from 9.9%) AlertPay to SolidTrust Pay at 3.9% (down from 7.9%) AlertPay to Perfect Money at 5.9% (down from 9.9%) ACT NOW! Go here to place an exchange request: http://xchanger.org Also, don’t forget about our 20% off Discount Code: XCFSTIME. Use this discount and you’ll save 20% off the fees charged. The discount code only works for those who haven’t made any exchanges yet (first time orders only).
That is all I would like to say, enjoy the services of Xchanger!
It is not uncommon that when you download a free software from a site ,it might be downloaded bundled with virus.Otherwise you have to search for a trusted site to get the application.Also the mirror sites might not have the latest release of the software. If you’re looking for a neat way to get free applications from one place, you should try ZeuAPP. ZeuAPP is free software application that allows you to download free and open source programs with just one click of button.This will download the software from the trusted site for you and once the download is over it will start the installer for you. ZeuAPP in its list contains 76 applications.All applications are free and open source, and you are free to download them. The categories of applications includes Audio and Video ,Archivers,Internet,CD Burners,File sharing,Games,Graphics,Chat tools,Security and office tools. Here is the 4 simple steps to follow once you run the ZeuAPP application.
Choose program you want to install and click download.
Now you will display a new form
On that form click download and choose where to save program and the download will start automatically.
I love watching videos, and YouTube has always been one of the most visited websites on my computer. And I know that there are millions of users who love watching videos on YouTube.
If you are an iPhone user and happen to love a video on YouTube, how would you download it? Well, I have already shared ways to download YouTube videos on Android, and its time for the best way for iPhone and iPad. Yes, I am talking about the best ways to download YouTube videos on iPhone and iPad.
Now there are number of ways to do it. Some people prefer downloading them on their PCs, convert them and transfer them to their iOS devices. This surely takes some efforts. So lets deal with best way which would let you download these videos straight onto your iOS devices.
Best Way To Download YouTube Videos On iPhone & iPad
MXTube
If your iPhone or iPad is jailbroken, then you can consider trying this app once, MXTube. Once you install this app and browse around, you will realize that this is amazingly easy to use.
By the way, here are some of the ways to jailbreak your iOS devices.
Use its search bar to look for the videos and tap on the one that you wish to download. Now it would ask for the video quality. Just tap on the one that you want, and the download would start. That is it!
In order to watch YouTube videos offline (that you have downloaded), tap on the Videos tab and choose the one that you wish to watch.
If you really want to have an iPhone or iPad, which is capable of downloading YouTube videos, then you would have to jailbreak it. And once you do it, you would realize that there are number of other options like TagDisk Lite, MyTube and YourTube. These Cydia apps lets you do the same stuff, that MXTube lets you do. And the reason I am sharing MXTube, is that it is so very to use.
I would also like you to check the other apps too because the fact that MXTube is a better app is totally subjective. See if you like the other app better.
Google’s open source Android operating system became one of the large hits in mobile technologies. Many different types of mobile phone models are showing up based on this, and it’s going for non-phone systems too. Android application improvement has also grown up. Over the last few several weeks we have observed a tremendous development of Android OS towards the extent it now instructions over 43% market share in the actual mobile Operating system space.
Install Android upon PC
While many people are attached to the gadgets, all of us still depend heavily upon our computer systems. What if you can just use the Android operating system on your pc? Fortunately, you’ll be able to do this. This can be done by developing a Live Compact disc or VirtualBox. To be able to Install Android On PC, you need to adhere to few easy steps. Mobile Phones according to android platform usually tend to should have the best place within market and also it is not only set to Mobile phones, the Android Operating system is now readily available for Tablet PCs too. So, if you’re bored with Android Operating system on your Cellular or Pill and want to test the fit your PC, or even notebook, here’s a process to test that takes you to Install Android on PC.
Running Android in your PC
Download android through Android-x86 and duplicate it inside your flash drive or even memory card. Browse down as well as download this from the steady release portion of the site. This can download a good ISO file in the website. Additionally Make sure your own memory gadget having storage more than 256MB making your storage drive thoroughly clean before duplicating android into it. Step 1: You’ll need UNetbootin (Universal Netboot Installation technician) to run android in your system. It’s available for all of the leading os’s. Step 2: Insert your own drive that you simply going to set up your android Operating system. UNetbootin extracts the actual ISO file associated with android OS that you simply downloaded as well as install it within the target drive. Step 3: Consider the situation wherein you’ve down loaded UNI for the windows system. All you need to perform here is simply insert generate in order to install android on pc. Step 4: University extracts the actual ISO file associated with OS that you simply downloaded and choose the target drive. Now, it’ll begin extracting the actual file through ISO and set up in your drive. Step 5:It’ll not take enough time for the memory stick to get set up with Android Operating system. It’ll ask you to restart your PC; you are able to reboot
Best Method to Install Android upon PC
immediately or close this, and can operate OS without notice. Step 6: The next step is in order to reboot the machine with memory stick to run android Operating system. You need to alter the boot set up as “boot through Removable disk“. Automatically, the hard generate will be chosen to reboot- push F2 to change the actual boot set up. Step 7: You can easily alternation in the Trunk menu’s BIOS setup after which press F10 in order to save your modifications. After carrying this out exit the actual BIOS setup. Your computer will instantly restart as well as show recption menus in front of you with lots of options. When you are done with these types of installation actions, you can operate your computer or even laptop driven with Android operating system. For individuals who has found the work on their program successfully could enjoy all of the applications, functions and improvements looks as well as works great! Aside from the small issues about Universal serial bus disconnection, which could end up being vexing, other features such as Wi-Fi, Mouse, Wireless bluetooth, Keyboard along with other peripheral contacts looks adequate. The advantage of by using this OS is you can back all of your data about this OS within the USB stay and can usually recover within another pc when your pc fails. Furthermore interesting and humorous is that this Android Operating system comes with Android market and for that reason you have loads of applications in order to browse and revel in!
There are many great tutorials on the web for using a Mac to install Mac OS X Snow Leopard on a PC. Unfortunately, you may be unable to follow such tutorials if you do not readily have access to a Mac to perform the preparation necessary for the installation. Great progress has been made in hacking PCs to run OS X, and it is now possible to install Mac OS X without a Mac. Thanks to some great tools put together by some brilliant hackers, it is also much easier and does not involve nearly as much time and effort as was once required.
Step 1: Getting The Hardware Ready
I recently purchased the following set of hardware for the purposes of building a Hackintosh (often PCs running Mac OS X are referred to as such):
The motherboard has an 8-pin power connector on it, and although it is possible to connect a single 4-pin connector to it, you may encounter odd issues running with just a single 4-pin connector. To ensure that you provide sufficient power to the board, you should purchase the 4-pin to 8-pin power adapter. Alternatively, you could purchase a power supply with 3x 4-pin connectors (1 for the 20+4-pin main connector, and 2 for the 8-pin connection) or an 8-pin connector.
I did not purchase a hard drive or video card, as I used some I already had from another PC, but you will need those items as well. As of the time this article was written, you can get a 1TB drive shipped for $75 and an NVIDIA GeForce 9500 GT video card for $65. I also purchased v10.6.3 of OS X Snow Leopard retail DVD for a mere $29 (was about $35 with shipping & handling). All-in-all, the full system (without monitor) will run you around $600 (you could also add a 22″ monitor for $170). You could certainly try doing it even cheaper with different hardware, but you’ll need to figure out the appropriate changes to make in the BIOS and boot loader installation. I did my best to put together a fairly modern system for a very reasonable price. Having used this set of hardware, I can affirm that it runs OS X Snow Leopard very well. Without a doubt, $600 – $800 is a far cry from what you would spend on an equivalent Mac from Apple. Granted it won’t be as compact or pretty as an iMac, but it will be just as functional.
Step 2: Putting The Hardware Together
If you purchase the hardware I used, along with a hard drive and NVIDIA GeForce video card, you should be able to follow the instructions exactly as I’ve laid them out. If you’ve never built a PC before but are willing to give it a try, you’ll definitely want to check out The Idiot’s Ultimate Guide to Build Your Own PC. It is a step-by-step guide to building your own PC, with plenty of photos to help you out. You can try following this tutorial with existing hardware you have as well, although you may need to make adjustments when configuring the BIOS and installing the boot loader. The more modern your hardware is, the better the chances are it will work for you. It would be best if you have a 64-bit Intel dual-core (or quad-core) processor, although an older CPU might still work as well. I would recommend NVIDIA GeForce video card, but ATI cards should work too.
Step 3: Prepare The Boot Disk
In addition to the hardware and a retail copy of Mac OS X Snow Leopard, you’ll also need a blank CD. You may want to use a rewritable CD if you’re using a different hardware configuration, just in case the first one I recommend doesn’t work for you. There are two boot disk images that will allow you to install OS X directly from the installation DVD:
I successfully used both of them with my hardware setup. However I recommend you try iBoot first, as it is a bit leaner and doesn’t take as long to boot. If you’re using my hardware configuration, be sure to download the iBoot Supported disk image. If you use Empire EFI, download the Empire EFI v1.085 R2 image. You can use one of many free programs to burn CDs if you don’t have one. Be sure to use the disk image burning mode in your CD burning software. Do not just simply copy the disk image file to a blank CD. I like InfraRecorder, because it makes this very easy. All you have to do is click the Write Image button, select the image, and burn it. Once again, you may wish to use rewritable media if you’re using a different hardware configuration than mine.
Step 4: Bios Configuration
Fortunately, the Gigabyte GA-H55M-USB3 does not require a lot of configuration to run Mac OS X. When you first turn on or reboot the machine, press the delete key to enter the BIOS setup. You can just load the Optimized Defaults, and just make a few changes within three sections of the bios: Advanced BIOS Features, Integrated Peripherals, and Power Management Setup.
4.1 – First, go to Advanced BIOS Features and set the First Boot Device to CDROM. I have my USB drive as the second drive and then Hard Disk as third – you can configure yours the same way if you wish to ever boot from a USB drive. Just be sure that Hard Disk is the Second Boot Device or Third Boot Device.
4.2 – Next, configure SATA to run in AHCI mode in the Integrated Peripherals menu. You’ll need to set both PCH SATA Control Mode and Onboard SATA/IDE Ctrl Mode to AHCI.
4.3 – Finally, go to Power Management Setup and set the HPET Mode to 64-bit mode.
Step 5: Installing Mac OS X
5.1 – Insert the iBoot (or Empire EFI) boot disk. 5.2 – When you see screen below, eject the disk.
5.3 – Insert the Retail Mac OS X Snow Leopard DVD, wait a few seconds, and press F5. 5.4 – When you see the screen below, select Mac OS X Install DVD (it should already be selected) and press Enter.
5.5 – If all goes well, you should eventually see the language selection screen for the installer. If all did not go well and you do not make it to the language selection screen, try downloading a different version of iBoot or Empire EFI. 5.6 – Select your language and click the arrow to proceed. 5.7 – Next, you need to partition your drive. Click on Utilities > Disk Utility. 5.8 – Select your disk drive. 5.9 – Click Partition. 5.10 – Select 1 Partition for the partition scheme. Note: If you have a drive that is larger than 2 TB, do not create partitions larger than 1 TB. Split the drive into multiple partitions, and be sure the main installation partition is 1 TB or smaller. 5.11 – Enter a name for the partition (I used Hackintosh). 5.12 – Select Mac OS Extended (Journaled) as the Format.
5.13 – Click Options…, select GUID Partition Table, and then click OK.
5.14 – Click Apply. 5.15 – Quit Disk Utility and proceed with the installation. Install on the Hackintosh partition.
Step 6: Installing the Boot Loader
Do not fret when you reboot after the installation and get a boot error, as you will need to first boot the machine with iBoot (or Empire EFI). Eject the Mac OS X Snow Leopard install DVD, put your boot CD back into the drive, and reboot the machine. Now when you boot up, you should see a second choice for your installation partition (Hackintosh if you named it that way). Select the Hackintosh partition and press Enter to boot into OS X. Once you’ve completed the first-run setup, open up Safari and download Multibeast. Multibeast is another superb tool by tonymacx86 and MacMan that makes it stupid easy to install the boot loader, along with all the drivers necessary for your Hackintosh to function properly. In addition to downloading Multibeast, you will need to download the DSDT for the Gigabyte GA-H55M-USB3 and copy it to the desktop. Be sure to save it as
DSDT.aml
. Launch Multibeast and make the following selections (your choices will differ if you have a different motherboard/hardware configuration):
After MultiBeast finishes installing, eject the iBoot CD and reboot the system. You should be able to boot right up from the hard drive, and all your devices should work just fine.
Step 7: Getting Started with Your New Mac
So what now? Most certainly you’ll want to check out 5 apps to get more out of your new Mac as well as 15 must-have apps for your Mac. In fact, you should probably just go ahead and browse the entire Mac section on MakeUseOf, as you’ll find a wealth of great free stuff for your new Mac in there. And most importantly make sure to download MakeUseOf’s getting started manual for Mac. Highly recommended for switchers. If ever you encounter into problems with your new Mac, you can always seek help from MakeUseOf Answers. If you have any problems installing Mac OS X on your PC, just post a comment right here and we’ll do what we can to help. Just be sure to provide as much information about the hardware you’re using:
Motherboard make and model (i.e. Gigabyte GA-H55M-USB3)
CPU model (i.e. Intel Core i3-530 )
GPU model (i.e. NVIDIA GeForce 9900 GT)
I never managed to get sleep to work. When I try to put the computer to sleep, it sort of goes into a coma. The fans never shut down and the machine doesn’t wake up when you press the power button. If you manage to get sleep to work with my hardware configuration, please do feel free to share your solution in the comments on this article. There are also many great forums and sites out there that provide a lot of information and assistance with running Mac OS X on PC. Here are just a few you may want to check out:
If you do seek assistance from any of these or similar resources, be sure to search for your problem before posting it. You will be flamed to no end if you ask a question that has already been answered. Another tip for posting in these forums: never call it a MAC (in all caps) instead of a Mac, or you will solicit many abusive responses. Mac is an abbreviation not an acronym. Here are a few more links that provide tools and files to help you set up a Hackintosh on hardware other than what I’ve mentioned here:
myHack – Another bootloader/kext installer, similar to Multibeast
Kexts.com – A good resource for downloading Kexts (device drivers)
Kext Helper – A tool that makes it easy to install new Kexts
Kext Utility – A tool to ensure proper kext installation
Chamelon Boot Loader – The boot loader that pretty much all the boot disks out there use (including iBoot and Empire EFI).
netkas PC EFI – Used in combination with Chameleon to provide maximum compatibility for booting OS X. Most boot disks use this as well.
BootCDMaker (French) – Utility (for Mac) to create your own custom boot disks
A million thanks to tonymacx86 and MacMan for developing iBoot and Multibeast to make installing Mac OS X Snow Leopard on PC a piece of cake. Enjoy your new Hackintosh and let us know what you think of it! Disclosure Statement: Please note that the links to the hardware in this article are affiliate links. MakeUseOf will earn a small commission on any purchases you make. Commissions earned will support the staff of MakeUseOf and allow us to continue to bringing you more great articles. Disclaimer: Please note that running Mac OS X Snow Leopard on hardware other than a Macintosh is against the Mac OS X End User License Agreement (EULA). If you have concerns about this, you may wish to read Is Making Your Own Hackintosh Legal? By installing Mac OS X you are in breach of a contract (breaking a contract is not the same as breaking the law). As long as you own a legal copy of the software, you are not in violation of copyright law.

 GoogleMe is not official announcement from google team but this rumour is rocking the internet on fire . Right now addicted netizens as well as beginners know only of the hardcore two giants - Facebook and Google and now when google launched buzz , it failed miserably but still its still one of the bookmarking kinda service and many widgets are usually seen in 3 - 4 blogs :)


 If you want to take your time scrolling through the open windows, hold the Ctrl key down while you press the Alt and Tab key. The thumbnail panel will open and stay that way even after you release all the keys. This allows you to use the right and left arrow keys to find the one you want. When you've highlighted the window you want to work with, press Enter to close the panel and display the selected window on the desktop.